Entries in How To (129)

Wednesday
Dec132017

Need to check the calendar? Here’s a quick method of doing so in Windows 10.

IF you don’t have Outlook open and you don’t want to wait for it to open up then here is a quick and easy method of gaining access to your calendar information.

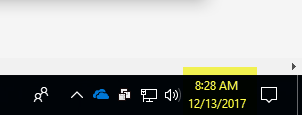
Windows 10 has added a easy method of checking what you have on your calendar by clicking on the date/time on your task bar. Look on the left had side of the taskbar and you will see something that should like the image below.

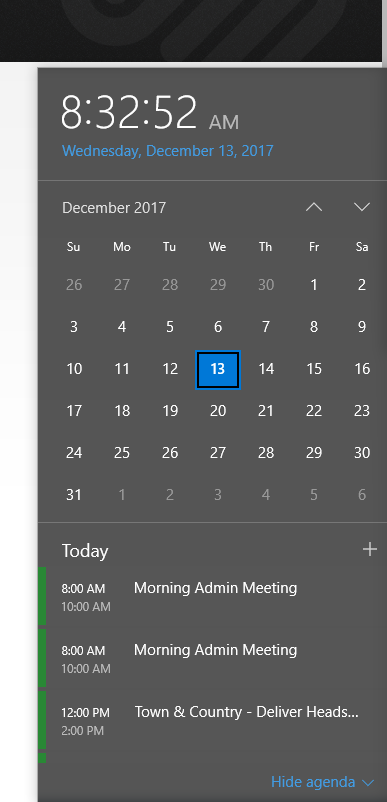
If you click with the left mouse button on the date/time you will see a pop-up calendar highlighting today’s date with your current appointments listed. See image to the left.

When you click on different dates, that date’s appointments will appear in the list at the bottom of the screen. You can use the up and down arrows to change the month.

To jump quickly to another month or year click on the Month/Year heading and a pop-up will be displayed for quickly moving to the year and month you want to work in. That displays a list of months for the current year. Use the up and down arrows to change years or click the year heading to jump to a list of all years in the current decade.

To quickly jump back to the current date click on the date line above the calendar and below the time display and you will instantly move back to the current date.

(Windows tip of the Week idea from Ed Bott of Microsoft Weekly)

Monday
Aug292016

So how well does all your home automation equipment work together?

imageIf you have been playing with home automation for a while, it is probably starting to look a little like the Tower of Babel. No two systems seem compatible with each other and up to now there hasn’t been a way to have centralized management between it all.

The Logitech system appears to have support for a broad base of manufacturer systems. Control devices from Philips Hue, LIFX, August, Sonos, Harmony, Lutron, Insteon, and Belkin WeMo. This type of system is what I would use for that broad base of consumer products that you would pick up at your local Lowes, Home Depot, Walmart, Costco or Sam’s Club. These systems were never meant to be interoperable but with the Logitech System you bring them all together.

The main BRAIN is a bridge unit that you plug into your power and connect into your Wi-Fi network. From here it goes out an identifies what you installed in your home. Using the App you can add more that the, system doesn’t find. Once you have gone through the discovery process, you now have the ability to begin creating your controlled environment.

The control buttons are used to created easy switches the have up to three sequences that can be programmed to them. TO operate them it is just a simple press of the button but how you press it determines which of the three programs you want it to run. The options are a single click, double click or a continuous hold down of the button to achieve these three options.

The buttons can either be mounted using a self-adhesive back or just placed on a table top. They have a replaceable battery in them that lasts up to five years before you need to change them out. System Specifications

The Starter Pack includes:  Home switch (x2, with battery), Plug-in bridge, Mounting tape (x2) and User documentation priced at $99.99. Each add-on switch costs $39.99. It can be controlled either by iOS or Android devices. I haven’t found out whether it can be controlled from a PC yet but if your techy enough you can probably figure a way around that.

While this isn’t the system I would necessarily use if I was starting out today when I compare it to one of Honeywell’s advanced systems but if you are a do-it-yourselfer, and are using different technologies to accomplish different tasks then this can be a great way of bringing it back together.

More info on Logitech’s Pop Home Management System

Tuesday
Aug092016

Lost Outlook Folders Display

Here is a quick video I just put together showing how to restore your Outlook folders display if you accidentally lose it. It could happen in one of two ways so I have both of them listed in the video. Let me know if you have any questions.

Monday
Jul042016

Build an On-Line Company-Wide Data Store

One of the ideas that I have been toying with is how an organization that has only a few users design their document storage around a cloud option rather than with an on premise server. There are several questions that come up when considering this and I would like to explore these in this post.

I am going to approach this with the thought of using Microsoft Office 365 has the core product and then explore other options that might enhance this total solution. In a smaller environment that has fewer than 150 users and doesn't have a need for Microsoft's Access Database Program, then Small Business Premium Subscription will provide each user with Microsoft Office desktop installations, hosted Exchange and on-line storage.

Storage

Each user license provides a personal storage using OneDrive of 1 TB and in a Team Site (SharePoint) an initial 1 TB plus 500 GB's per licensed group member. In a small group of 5 licensed employees, each employee would have 1TB personal storage and the group would have 3.5 TB's shared storage.

As you can see, the more people you have in the group your team shared storage will grow quite quickly. In a lot of cases, the cost of having this much storage on a local file server would increase the cost of the initial equipment and the cost of your backup of that data. If you wish to have cloud backup, you're going to have the cost and logistics of getting that data off-site as well.

Backup

Microsoft provides some limited backup of you data but doesn't have a true archival backup solution. Luckily we do. Using our Cloud backup program, we have the ability to back up the entire contents of your Office 365 site for just pennies per user per day. In the example of a five user office, $21.25 per month. This includes backing up all of your data including your SharePoint and your Exchange data. And it is

easy to setup and restore from as necessary.

clip_image001

Setup

In this example you see that I have several SharePoint sites setup on our system. The primary site is our Team Site which contains different kinds of list data, calendars, announcements and links to special information including tutorials, vendor sites and other special pieces of information. I have also created a subsite called PAconnect. This is a site's sole purpose is as a document holder for our on-line document storage. I have shared this site with everyone in our organization so everyone has access to the information here. The last subsite that I have here is a SharePoint site that has limited access. Only the admin group of people will ever be able to access the data located here. You see here that you want to put some thought behind how you set up your SharePoint sites, what their use is, in other words what kind of information you want to put there and lastly who you want to be able to access it. Your administrator of the account has the rights initially to set up the rights mask for the site so whomever is in control will be the one that can set this up.

Here is a link that will help you get started with understanding SharePoint Libraries.

clip_image002

Synchronizing your Library

Once you have created the file structure of your library you will want to create your synchronization to it to your desktop This enables you use it just as you would any document folder you have on your computer. With synchronization setup you will be able to easily access, update current documents and store new documents to your shared area. The other benefit of SharePoint Libraries is versioning. This gives you the ability to restore your document to an earlier version if you make a mistake. Your site admin needs to setup this up and will enter how many earlier versions to keep available.

clip_image003

Turn on Versioning

By default, versioning is turned off. To turn it on and implement your versioning decisions, you must either have Full Control or Design permissions. The picture above shows you the options that are available when your edit the Library's Settings. A good overview of what all of these options are and what they allow you to do can be found here. This is a link to your on-line SharePoint Help site. Another great place to start looking at to learn how to use document libraries.

Friday
Apr222016

How do I share my work calendar with all the applications that I use?

image

Like a lot of you, I would want to have to enter information into my computer once in the best of all worlds have it show up everywhere that I may want to access it from.

I live and breathe inside of Microsoft Outlook with everything from email, scheduling, task management and accessing information about the people I need to be in contact with. So Outlook is a good container to house all this information for me. It also integrates with a lot of the business applications that we use at our office so it is an essential part of my daily routine.

So over the past month I've been experimenting with some ways to be able to share information that is in Outlook with other applications and devices that I use. The picture to the right is a good example of how I have accomplished at some the things that I use on a daily basis.

Google Calendar seems to be the central application that I need to coordinate the sharing of all the calendar data. Using a shareware program that I've commented on last month, called Outlook Google Calendar Sync, I have the conduit that I can use to connect Outlook calendar to Google calendar and have them synchronized automatically. This allows me to set up the connection from Cozi Calendar to Google Calendar to display all of my events for my family to share, again, without me having to reenter the information.

So now as I enter new events into my Calendar in Outlook, the Outlook Google Calendar Sync Application periodically updates Google Calendar and when ever my wife looks at our family Cozi Calendar she has the ability to plan around my schedule very easily. Another nice thing that happens is that unable to connect our Amazon Echo to my Google account and when I come down in the morning I can just ask Alexis what my days schedule is. I know then what I have to ramp up you soon I need to get moving towards the office. Voilà! Information at your fingertips

  • Outlook Google Calendar Sync - Offers calendar synchronization between Outlook and Google, including attendees and reminders. Completely free, no install necessary, works behind web proxies and actively developed.
  • Google Calendar -  With Google's free online calendar, it's easy to keep track of life's important events all in one place.
  • Cozi - Cozi is the must-have organizer for families. It helps coordinate and communicate everyone’s schedules and activities, track grocery lists, manage to do lists, plan ahead for dinner, and keep the whole family on the same page.
  • Amazon Echo - Echo provides hands-free voice control for Amazon Music, Prime Music, Spotify, Pandora, iHeartRadio, and TuneIn. Plus, Echo is Bluetooth-enabled so you can stream other popular music services like iTunes from your phone or tablet. .
Tuesday
Apr192016

Surface Book-OneNote-Handwriting-Text

I have been continuing to work with my Surface Book and finding new things that I can do with the pen or other applications in Windows 10 that are really quite amazing. I have been working between the OneNote App and the Desktop OneNote Program to see what the differences are and how to work around some of the limitations I have found in the OneNote App. If you take a quick look at it you don’t have anywhere near the options but the big ot ne that I see missing is the ability to transform handwriting to text. This is something that the OneNote Desktop Program does very well and is missing from the App. Not a problem though. If after you have done all your handwriting in the OneNote App when you are at a meeting or seminar or wherever, all you need to do is jump to the desktop program and go to the draw tab while on the page with you handwritten text and choose the function to Ink to Text. It works like a champ

Tuesday
Feb102015

Outlook 2013–Export Contact List to .csv format

Had a customer ask how to export their contacts to a .csv format. Here is a video I whipped up to show them how.


Thursday
Feb052015

How to add a Group List to your Contacts in Outlook

Monday
Oct132014

Use SmugMug’s tutorial library to get the most out of your subscription

If you have been reading my blogs for a while you know that I use SmugMug as my preferred method of sharing photographs with my family and friends. This is something that I have done for a number of years and have probably not taken advantage of all of the features and benefits that this service offers.

This morning I ran across a post from SmugMug listing a few of the free tutorials that they offer subscribers to learn how to take advantage of their services. If you haven’t gone through them then you will want to spend a little time doing so. Most of us take the shortest route to using products, hoping that our intuition and intelligence is enough to muddle our way though their use. So here is a simple and enjoyable way to make your experience better with this service. Make the most of it!

Here is a list of some of the tutorial subjects that are available:

  • How to Add a Contact Form (1:59)
  • How to Edit the Navigation Menu (2:09)
  • How to Add Content Blocks (2:08)
  • Advanced Photo Editing with PicMonkey (2:26)
  • Organizing for a Family Photo Website (3:57)
  • Organizing for a Pro Photog Website (3:59)
  • How to Set a Custom Right-Click Protection Message (1:21)
  • 5 Settings to Protect Your Photos (3:11)
  • Wednesday
    Oct092013

    Use Windows Easy Transfer over a network to migrate from XP to Windows 8

    This hand article from TechRepublic discusses the use of Windows 8’s Windows Easy Transfer tool. If you are planning the big move before Windows XP’s support vanishes next April then this may be helpful to you. While not 100% this will help with the process. One of the drawbacks of using this tool is that it does not transfer applications.This means that you will have to manually reinstall those applications that you are using to access the data.

    Another product available out there for you to use is a program from LapLink called LapLink PCmover that we have had pretty good luck with migrating not only your settings and data but also most of your applications. This is very handy and if you wish to purchase a copy for yourself it only costs $59.95. So if you are ready to make the big move to either Windows 7 or 8 from your XP machine this may be a product you’ll want to add to your toolbox.

    • Easy-to-Use Wizard
    • Now Includes Free Transfer Assistance!
    • Set it and Forget it
    • Undo Feature
    • Complete Selectivity
    • Multiple Transfer Scenarios
    • User Profile Selectivity
    Tuesday
    Jun112013

    Shut down Windows 8 from the keyboard | TechRepublic

    Great article to add some new features to your Windows 8 machine. Worth taking a quick look at this.

    Shut down Windows 8 from the keyboard | TechRepublic

    Friday
    Nov022012

    Activating Windows 7

    I know this is simple and easy but here it is in case you don’t know where to go.

    Thursday
    Sep272012

    Accessing our Client Portal

    I have put together a short video demonstrating how you access your client portal screen. This portal provides you with access to your service tickets, both past and present, the ability to add comments and provide additional information to our service department on open service tickets and to create new service tickets. Please feel free to use this to help us better server you.

    If you haven’t received your login and password to access your system please contact us to set this up for you.


    Tuesday
    Sep182012

    iLounge Article: Removing an iOS device from an iTunes account

    By Jesse Hollingtonimage

    Applications Editor, iLounge (Google+)
    Published: Tuesday, September 18, 2012

    Good show and tell how to remove an iOS device from your iTunes account. I like to earmark these for future use.

    Remember that you can only have only a maximum of 10 devices per iTunes account and this is probably the main reason to get in and manage your device list.

    Tuesday
    Aug212012

    Lexmark Printer Tip–Prevent Paper Jams

    imageHere are some techniques on how to help prevent paper jams in you Lexmark printers.

    While your competitors are parked on the phone with tech support trying to clear a paper jam, you can zoom right past them on the road to success. To avert paper jams before they happen, try these easy tips:

    · Fan the paper like you do with playing cards and then align the edges.
    Quickly prepare the paper. Watch video »

    · Make sure the paper lies flat in the tray.

    · Don't remove trays while the printer is printing.

    · Don't load trays or feeders while the printer is printing. Load them prior to printing, or wait for a prompt to load them.

    · Don't load too much paper. Make sure the stack height does not exceed the indicated maximum height. Best way to load paper. Watch video »

    · Make sure the guides in the paper trays and feeders are properly positioned so they are not pressing too tightly against the paper or envelopes.

    · Push all trays in firmly after loading paper.

    Paper tray recommendations
    • Make sure the paper lies flat in the tray.

    • Do not remove trays while the printer is printing.

    • Do not load trays, the multipurpose feeder, or the envelope feeder while the printer is printing. Load them prior to printing, or wait for a prompt to load them.

    • Do not load too much paper. Make sure the stack height does not exceed the indicated maximum height.

    • Make sure the guides in the paper trays, multipurpose feeder, or envelope feeder are properly positioned and are not pressing too tightly against the paper or envelopes.

    • Push all trays in firmly after loading paper.

    Paper recommendations
    • Use only recommended paper or specialty media.

    • Do not load wrinkled, creased, damp, bent, or curled paper.

    • Flex, fan, and straighten paper before loading it.

    • Do not use paper that has been cut or trimmed by hand.

    • Do not mix paper sizes, weights, or types in the same stack.

    • Make sure all sizes and types are set correctly in the printer control panel menus.

    • Store paper per the manufacturer's recommendations.

    Envelope recommendations
    • To reduce wrinkling, use the Envelope Enhance menu in the Paper menu.

    • Do not feed envelopes that:

      • Have excessive curl or twist.

      • Have windows, holes, perforations, cutouts, or embossing.

      • Have metal clasps, string ties, or folding bars.

      • Have an interlocking design.

      • Have postage stamps attached.

      • Have any exposed adhesive when the flap is in the sealed or closed position.

      • Have bent corners.

      • Have rough, wrinkled, or laid finishes.

      • Are stuck together or damaged in any way.

    Following all these recommendations and still getting paper jams? If you've been getting a lot of mileage out of your Lexmark printer, it may be time for a new maintenance kit or pick rollers. Contact Lexmark to help with printer troubleshooting before taking any more action.

    Wednesday
    Aug152012

    What you need to consider when setting up your home wireless network…

    Security

    SNAGHTML452664ceSecuring your WI-Fi connections is an important element of securing your personal data. You want your equipment and your data that is stored on that equipment to be protected from outside sources. Consider when you are setting up your network to purchase equipment that is able to use WPA2tm which provides both security (controlling who connects to your network)  and prvacy (the transmissions cannot be read by others) for communications that move across the network. Remember, the security level or a network is determined by the least capable device. So if you have older wireless equipment consider updating your equipment with devices that are capable of WPA2tm.

    Most Wi-Fi equipment is shipped with security disabled to make in easier to set up or connect to your network, Most new routers/wireless access points will walk you though your initial security setup and you have to force it not to do this to shut it off. It is very simple to set up and always pick the best overall protection that is suggested by the manufacturer. Change your SSID to a different name to differentiate from all the default units that are out there clogging up the airways. Make sure that you change the default administrative credentials as well (login and password). Though they make my job easier coming in to help you as a service person, it also makes it extremely easy for anyone to connect and make changes if you leave them with the defaults. Be sure to document what you did because otherwise you will have to reset everything back to factory defaults to and reset the connections if you forget.

    The Wi-Fi Alliance has produced a short video (below), that provides a humorous and informative reasoning for setting up your network securely using WPA2tm. It is so important to lock things down so be sure that you are providing a secure safe access for your family in your home. (Download White Papers from WI=Fi Alliance)

    Location

    The performance of a Wi-Fi home network greatly depends on signal strength of the wireless router or wireless access point (base station).

    If a given wireless client falls out of range of the base station signal, obviously that network connection will fail or "drop." Clients situated near the edge of the network range will likely experience intermittent dropped connections. But even when a wireless client stays within range consistently, its network performance can still be adversely affected by distance,obstructions, or interference.

    To position your wireless equipment for optimal network performance, follow these guidelines:

    • First and foremost, don't settle prematurely on a location for the wireless access point or router. Experiment; try placing the device in several different promising locations. While trial-and-error may not be the most scientific way to find a good spot for your equipment, it is often the only practical way to assure the best possible Wi-Fi performance.
    • Strive to install the wireless access point or router in a central location. If you have only one wireless client, installing the base station near this client is best. For WLANs with multiple wireless clients, find a good compromise position. Clients too far away from the base station will manage only 10% - 50% the bandwidth of clients nearby to it. You might need to sacrifice the network performance of one client for the good of the others.
    • Next, avoid physical obstructions whenever possible. Any barriers along the "line of sight" between client and base station will degrade a Wi-Fi radio signal. Plaster or brick walls tend to have the most negative impact, but really any obstruction including cabinets or furniture will weaken the signal to some degree. Obstructions tend to reside closer to floor level; therefore, some folks prefer to install their wireless access point / router on or near the ceiling.
      Avoid reflective surfaces whenever possible. Some Wi-Fi signals literally bounce off of windows, mirrors, metal file cabinets and stainless steel countertops, lessening both network range and performance.
    • Install the wireless access point or router at least 1 m (3 feet) away from other home appliances that send wireless signals in the same frequency range. Such appliances include some microwave ovens, cordless telephones, baby monitors, and home automation equipment like X-10 devices. Any appliance that transmits in the same general range as802.11b or 802.11g (2.4 GHz) can generate interference.
    • Likewise, install the unit away from electrical equipment that also generates interference. Avoid electric fans, other motors, and fluorescent lighting.
    • If the best location you find is only marginally acceptable, consider adjusting the base station antennas to improve performance. Antennas on wireless access points and routers can usually be rotated or otherwise re-pointed to "fine tune" Wi-Fi signaling. Follow the specific manufacturer's recommendations for best results.

    If using these guidelines you still cannot find a suitable location for your wireless gear, there are alternatives. You can, for example, replace and upgrade the base station antenna. You can also install a Wi-Fi repeater (often called a "range extender" or "signal booster.") Finally, in extreme cases, you may need to configure a second base station to extend the range of your WLAN.

    eg. My home is one of the worst situations that I could have put myself in to create a strong environment. My first problem is that I live in a multi-level home that has a lot of brick  on its outer walls and cement block surrounding the lover levels. I have a slate floor in the kitchen (this is a problem that I will explain later) and in the summer I need WiFi access in a greater than 150 foot area when I include the outdoor areas that we spend a lot of time in. My home office is in a wonderful little sunroom that sticks out away from the house so because the modem/router is located in this area I am feeding all my network and wireless access starting from this area. I ended up placing a second access point in a location that covers the second level bedrooms, mid-level living room and kitchen. The office unit covers the screened in porch and about half of the pool area outside. It is almost perfect but I could almost use a repeater to fully cover the pool area to bring it completely back into the network with speed and coverage. This took awhile to setup where I am now and you will find that you will want to work things out based on how you plan to use wireless access in your environment.

    Let us know if you have any questions, I will be very happy to discuss your needs with your as any or our technicians can.

    Tuesday
    Aug142012

    Lexmark Printer Tip – Lost Printer CD

    imageWant to connect your trusty Lexmark printer to a new computer, but can't find your printer CD? Don't put work on hold while you search every nook and cranny of your office. You can quickly download the most current drivers for your Lexmark printer right from our support site—and speed ahead like the pro you are. Here's how:

    1. Go to support.lexmark.com

    2. Choose one of the following steps:

    a. If you're a visual person, select your product type from the images and then select your printer model.

    b. If you want a shortcut, enter your printer model in the product box above the images and then click on the printer model.

    3. Click Support & Downloads on the left side of the page.

    4. At the bottom, select your operating system and version to see all options for your printer.

    You can now download current printer drivers and check out other tools to keep your device running smoothly, like firmware updates.

    Tuesday
    Aug072012

    Lexmark Inkjet Printer Tips

    imageThis is from a recent email sent out by the Lexmark News Group on some suggestions on how to maintain the best quality printing from your Lexmark Inkjet Printer.

    Don't get stuck troubleshooting print streaks, missing colors, or other print quality issues. Most of these printer problems are caused by clogs in ink cartridges, which form when ink dries inside the print head or ink nozzles. But if you keep your cartridges in good condition, your Lexmark printer will continue to run like a well-oiled machine. Here's a little advice that can help:

    1. Do you use your printer regularly? Of course, you shouldn't just print for printing's sake, but when you naturally have print jobs to do, don't hold back! Printing black and color documents multiple times on most days will help to avoid print quality issues by keeping the ink flowing, so it doesn't dry out.

    2. Use your printer less frequently? If your printer goes unused for lengthy periods of time with ink cartridges inside, your cartridge nozzles can dry out. This can affect your print quality or interfere with your printer's ability to do its job. When you're not planning on using your printer for a long period of time, remove your cartridges from the printer, place them in an airtight container and store them somewhere cool.

    3. Regardless of your print habits, don't let your cartridges run completely out of ink. Just like you wouldn't let your car run on empty, you can't let your printer run until the very last drop of ink is used. Replace your cartridges just before you're running on fumes—your printer will alert you when it's time. This simple step will ensure that your printer continues to function properly.

    Friday
    May252012

    Here's How: Set Windows 7 To Auto Log ON

    imageOur Mark Stein recently sent over instructions on how to turn on Auto Log ON on a Windows 7 System. I also found this excerpt from Microsoft’s Channel 9 that suggests that you might not want to do this, but if your heart is set on bypassing this security function read on…

    Although I don’t personally recommend this, there are some people out there who don’t want to bother with using a password to protect their Windows user account. Using a password in Windows isn’t required, only suggested. But even if you don’t fill one in, you still have to click your user icon to start the login process.

    An easier way - although again much less secure - is to enable auto-logins for your Windows PC. This is possible in Windows 7, as it was in prior versions, but it takes a little finagling to do so. (And for good reason, darn it.)

    Still, if you must do this, here’s how:

    1. Press the Windows key + R on your keyboard to launch the “Run” dialog box.
    2. Type in control userpasswords2
    3. Press Enter. The User Accounts window will display.
    4. Uncheck the option “Users must enter a user name and password to use this computer”
    5. Click “OK”
    6. You will then be prompted to enter the current password and confirm it.
    7. After doing so, you will no longer be prompted to enter your password upon login.

    Use this tip at your own risk!

    Thursday
    May032012

    Little known printer tricks for reducing business printing costs…

    imageLexmark has sent out the following list of tips to help you reduce the cost of printing. In fact, this advice works for any manufacturer’s printer line as well.

    Customize your printer setting and save.

    Did you know that you can change the settings on your printer to save paper and even energy? In fact, one simple change, like switching to 2-sided printing, can reduce your paper consumption by up to 50 percent.

    The following small changes can help you save big while avoiding many of the typical printing problems—and many of them can be made with little or no reduction in performance or quality. Best of all, you can change these settings in a snap, all from the main menu of your printer:

    Print double sided: Set your printer to "duplex mode" to print on both sides of your paper. You'll save paper and the environment.


    Use black and white: Change your settings to black and white printing, and make color the exception.


    Adjust the darkness: Set your ink or toner darkness slightly lower to reduce consumption and get more from each cartridge.


    Print only when you're ready: Set your printer to "print and hold" a print job in the printer until you are ready to retrieve it, instead of sending it to print and forgetting to pick it up.


    Print in draft mode: If you have an inkjet, set it to "draft mode" to use less ink for internal and draft documents, and to print much faster. You can then switch to higher quality settings when you need to print the final version.